Start your mornings right with my homemade breakfast hot pockets! These tasty treats are simple to make and fun to customize. In this post, I will share the ingredients you’ll need, easy steps to prepare them, and clever tips for perfect results. Whether you prefer a classic ham and cheese or a veggie-packed option, you’ll find something to satisfy your breakfast cravings. Let’s get cooking!
Why I Love This Recipe
- Comforting Meal: These hot pockets are a delicious blend of savory flavors, making them the perfect comfort food for breakfast or any time of day.
- Customizable Filling: You can easily modify the filling with your favorite proteins and veggies, allowing for endless variations.
- Make Ahead Option: Prepare them in advance and freeze for a quick breakfast option during busy mornings.
- Kid-Friendly: These hot pockets are fun to eat and perfect for kids, making breakfast a breeze for the whole family.
Ingredients
Main Ingredients for Dough
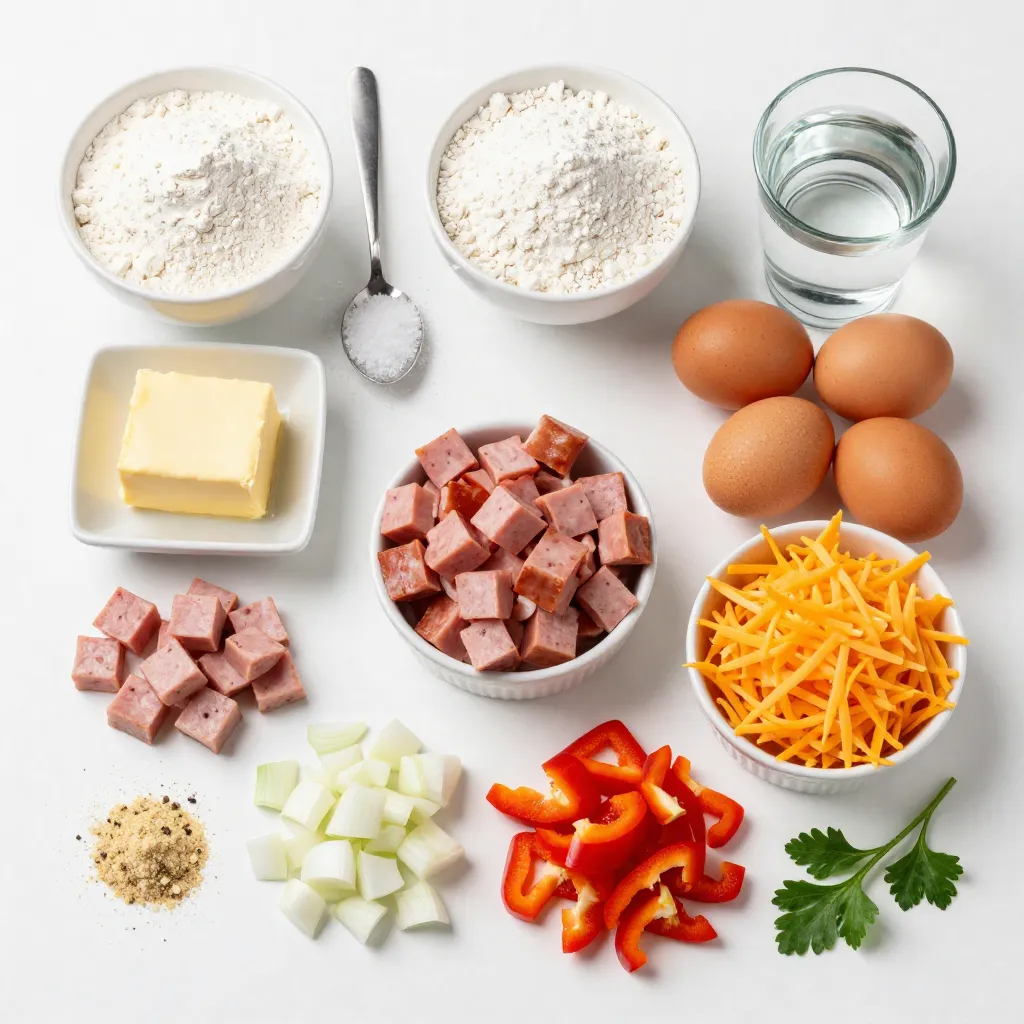
To make the dough for your hot pockets, you need:
– 2 cups all-purpose flour
– 1 teaspoon salt
– 1 teaspoon baking powder
– ½ cup unsalted butter, cold and cut into small cubes
– ½ cup ice-cold water
The flour gives the dough structure. Salt enhances flavor, while baking powder helps it rise. Cold butter makes the dough flaky. Ice-cold water keeps the dough from getting tough.
Filling Ingredients
For the delicious filling, gather these items:
– 4 large eggs
– 1 cup cooked breakfast sausage or diced ham
– 1 cup shredded sharp cheddar cheese
– 1 cup finely diced bell peppers (mix of colors for vibrancy)
– ½ cup diced sweet onions
– 1 teaspoon garlic powder
– Salt and pepper to taste
Eggs bind everything together. The sausage or ham adds protein. Cheese gives creaminess, while bell peppers and onions add color and flavor. Garlic powder boosts taste, and salt and pepper season the mix.
Optional Garnishes
To make your hot pockets pop, consider these garnishes:
– Fresh herbs (like chopped chives or parsley)
Fresh herbs add a bright touch to your meal. They enhance the taste and look of your hot pockets.
Step-by-Step Instructions
Preparing the Dough
Start by mixing the flour, salt, and baking powder in a large bowl. Use your hands or a pastry cutter to add the cold butter. You want it to look like coarse crumbs. Then, slowly add ice-cold water. Mix until it forms a dough. Wrap it in plastic wrap and chill for 30 minutes.
Cooking the Filling
In a large skillet over medium heat, add some olive oil. Sauté the diced onions and bell peppers until they soften, which takes about 5-7 minutes. Then, stir in the cooked sausage or ham. Heat it until warm. In another bowl, whisk the eggs, then add them to the skillet. Cook and stir until the eggs are scrambled. Add garlic powder, salt, and pepper for flavor. Let this mix cool a bit.
Assembling the Hot Pockets
Preheat your oven to 400°F (200°C). Roll out the chilled dough on a floured surface to about 1/4 inch thick. Cut rectangles of 5×7 inches. Place a spoonful of the egg and meat mix in the center of one rectangle. Top it with shredded cheddar cheese. Don’t overfill!
Baking Instructions
Fold the dough over the filling and press the edges to seal. You can use a fork to crimp the edges for a nice touch. Line a baking sheet with parchment paper, and place the hot pockets on it, leaving space between them. Bake for 20-25 minutes until they are golden brown and puffed up. Enjoy your homemade breakfast hot pockets!
Tips & Tricks
Achieving Perfect Dough Consistency
To make great dough, mix flour, salt, and baking powder well. Add cold butter next. Use your fingers or a pastry cutter to combine until it looks like crumbs. Slowly pour in ice-cold water. Mix until the dough forms. Be careful not to overwork it. Wrap it and chill for 30 minutes. This step helps the dough stay flaky and light.
Best Filling Combinations
The filling is key to your hot pockets. I love using cooked sausage or ham for a savory taste. You can also add bell peppers and sweet onions for crunch. Don’t forget the cheese! Sharp cheddar melts beautifully and adds flavor. Other options include spinach or mushrooms for a twist. Get creative! Try different herbs too for extra zest.
Baking vs. Microwaving: Pros and Cons
Baking gives you crispy, golden pockets. They puff up nicely and taste fresh. It takes about 20-25 minutes in the oven. Microwaving is faster but may leave the dough soft. If you’re in a hurry, a quick zap works. Just know that baked hot pockets have the best texture. Choose what fits your schedule!
Pro Tips
- Chill Your Dough: Keeping the dough chilled before rolling out helps maintain its structure and makes it easier to work with, resulting in a flakier crust.
- Variety of Fillings: Feel free to customize the filling by adding spinach, mushrooms, or different cheeses according to your taste preferences.
- Golden Finish: For an extra golden finish, brush the tops of the hot pockets with an egg wash before baking.
- Make Ahead: These hot pockets can be prepared in advance and frozen. Just bake them straight from the freezer, adding a few extra minutes to the baking time.
Variations
Vegetarian Options
You can easily make these hot pockets meat-free. Start by replacing sausage or ham with veggies. Use a mix of mushrooms, spinach, and zucchini for a tasty filling. You can also add more cheese for a creamy texture. Try using feta or mozzarella for a new flavor.
Gluten-Free Adaptations
If you need a gluten-free option, swap the all-purpose flour for a gluten-free blend. Look for a blend that works well for baking. Make sure your filling is also gluten-free. Check labels on all ingredients to ensure they fit your needs. With these changes, you can still enjoy homemade hot pockets.
Creative Fillings: Sweet & Savory
Don’t feel limited to just savory fillings. You can create sweet hot pockets too! Fill them with cream cheese and fruit like berries or apples. Add some cinnamon and sugar for a touch of sweetness. You can even make a breakfast dessert with chocolate chips and bananas. Mixing flavors keeps breakfast exciting!
Storage Info
How to Store Leftover Hot Pockets
After enjoying your hot pockets, let them cool down. Once cooled, wrap each hot pocket in plastic wrap or place them in an airtight container. This keeps them fresh. Store them in the fridge if you plan to eat them within three days.
Reheating Guidelines
To reheat, you have a few options. For best results, use an oven. Preheat the oven to 350°F (175°C). Place the hot pockets on a baking sheet and heat for about 15 minutes. This keeps the crust crispy. If you’re in a hurry, you can use the microwave. Heat each hot pocket for 1-2 minutes. Check to make sure they are hot all the way through.
Freezing Instructions
If you want to save them for later, freezing is a great option. Wrap each hot pocket tightly in plastic wrap and then in foil. This prevents freezer burn. Place them in a freezer bag or container. They can last for up to three months. To enjoy frozen hot pockets, thaw them in the fridge overnight before reheating.
FAQs
Can I use different types of cheese?
Yes, you can use any cheese you like. Try mozzarella for a melty texture. Feta adds a nice tang. Swiss cheese has a mild flavor that works well too. Mix and match cheeses for fun flavors!
How long can I store homemade hot pockets?
You can store hot pockets in the fridge for up to three days. Place them in an airtight container. For longer storage, freeze them for up to three months. Just remember to wrap them well to avoid freezer burn.
Can I make the dough ahead of time?
Absolutely! You can prepare the dough a day in advance. Just wrap it tightly and keep it in the fridge. This saves time on busy mornings. Chilling the dough also helps it hold its shape better when you roll it out.
What are other cooking methods for hot pockets?
Besides baking, you can pan-fry or air-fry hot pockets. Pan-frying gives a crispy crust, while air-frying cooks them evenly with less oil. For a quick option, you can microwave them, but they won’t be as crispy. Enjoy experimenting with these methods!
We covered how to make hot pockets from scratch. You learned about the key ingredients for both dough and fillings. I showed you step-by-step instructions to prepare, cook, and bake them perfectly. With tips on dough consistency and best filling mixes, you can create tasty combinations. Plus, I shared ideas for variations and storage.
Now, get creative with your hot pockets. Enjoy making them your ow